Anchoring your kayak can be a risky business, and yet it’s something every kayaker should be well versed in. A DIY kayak anchor system is a must-have for any self-respecting kayak angler!
When you’re kayak fishing, you should anchor to a point. In doing so, you can wait for a fish to bite while you enjoy the peace and quiet or strike up a conversation with a fellow angler.
There are ready-made kayak anchors for sale, which have their own fastening system.
However, it is also possible to build a DIY kayak anchor system yourself.
Here are some of the reasons for you to do this:
- Leaving on short notice and you didn’t buy an anchor
- You want to save some money
- You’re a DIY enthusiast
Read on to learn how to build a kayak anchor and what to pay attention to for maximum safety.
Table of Contents
How Do Kayak Anchors Work?
Even as a water sports enthusiast, you’ll enjoy a break from paddling and taking in the scenery. But if there is a strong current or wind, the kayak can drift very far away.
You should have an anchor on every paddling trip to prevent this. The principle of operation is the same as for yachts or motorboats.
For example, you can use kayak anchors in different waters, such as lakes, rivers, canals, and near the shore of a waterway.
Kayaking with your dog? Read our article on how to build a DIY dog kayak sidecar.
Stand-up paddlers can also benefit from such an anchor. However, anchors for kayaks or SUP are much smaller and lighter than for large boats.
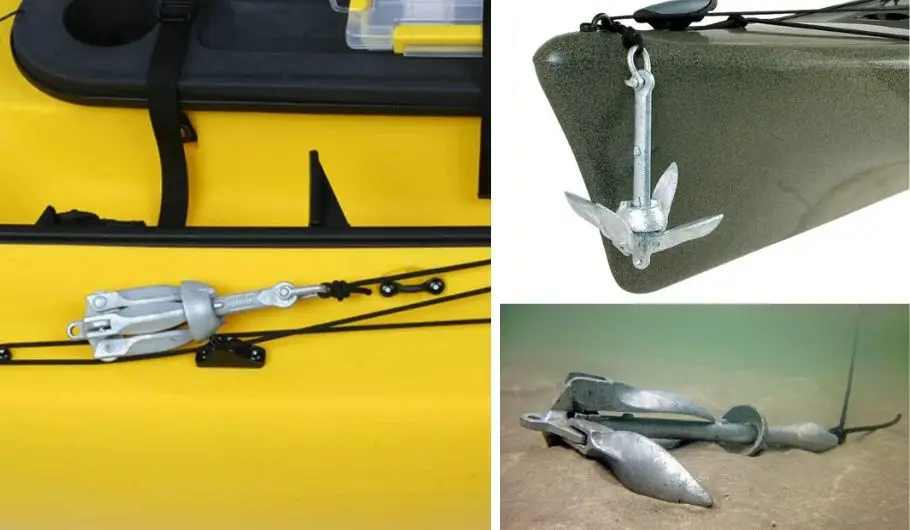
Some kayak anchors have folding “arms” or “flukes” for gripping the bottom (perfect for sandy lake floors). Others are made of concrete, brick, or other heavy materials to weigh the kayak down (great for muddy floors).
Yet, most models weigh less than 1.5 kilograms — heavy enough to keep you from drifting but light enough to transport comfortably.
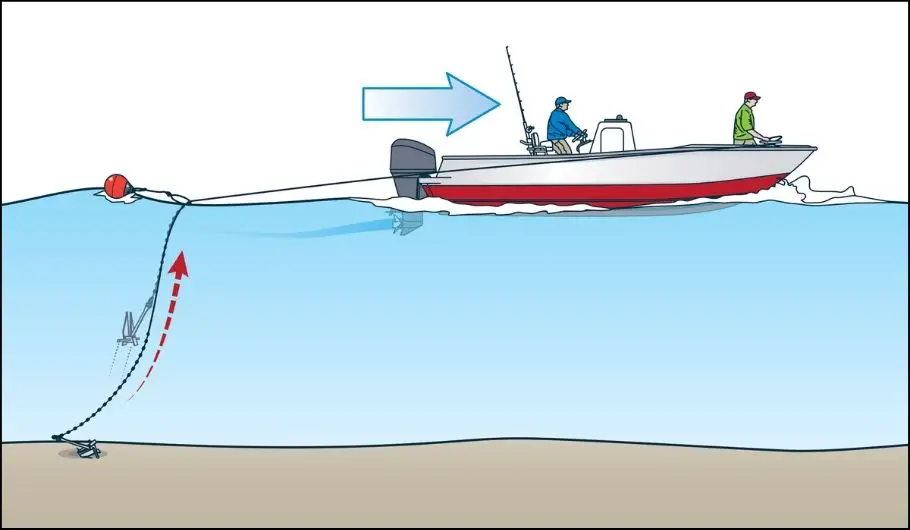
Using A Buoy With The Kayak Anchor System
A good tip is to tie two ropes to the anchor before dropping it to the bottom. One end will be attached to the hull and the other to a floating object. If the anchor gets snagged, you can release it by pulling on it from behind using the second rope.
Additionally, the buoy warns fellow anglers to be careful not to tangle their gear in your line.
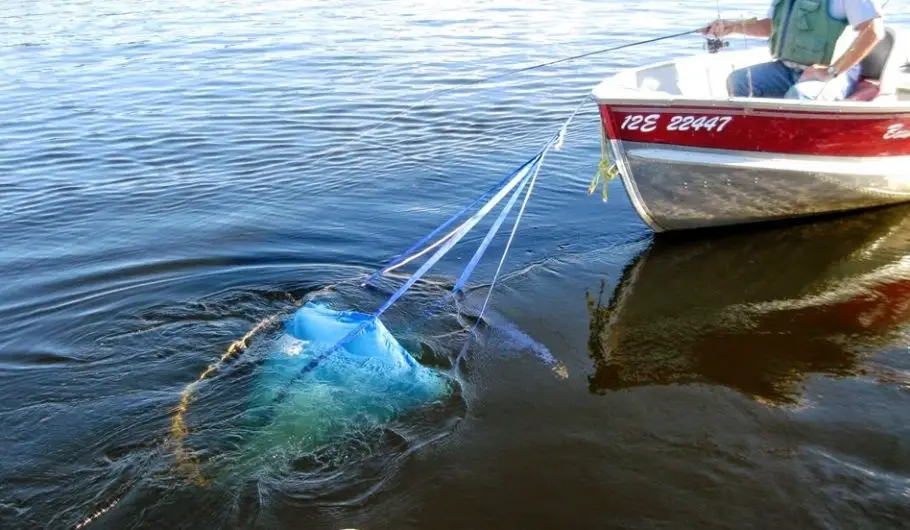
Drift Chutes
If you want to slow down instead of stopping entirely, you need a drift chute, a.k.a. drift sock. Once in place, it catches water, thus slowing you down.
It also comes in handy when you’re handling big fish on a line and you need a little weight support.
What Can Be Used as a DIY Anchor for Your Kayak?
Weight Anchor
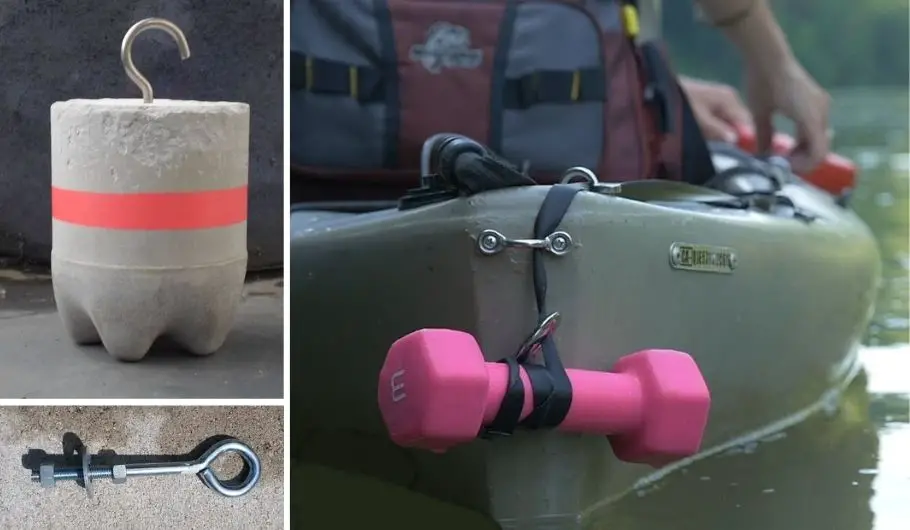
If you decide to use a heavier DIY anchor to slow your kayak to a stop, think about a dumbbell, brick anchor, or homemade concrete block.
You’ll also need some rope to allow you to retrieve the anchor quickly. The simplest method is a retractable dog leash. A more professional solution is a dive reel like this one.
Grapnel/Umbrella Anchor
You can also put together a proper anchor reel to keep your line neatly stored and in an easy-to-use format.
In this case, you are probably tinkering with a grapnel anchor with flukes (collapsible or not), which you can attach to the reel line and unravel as needed.
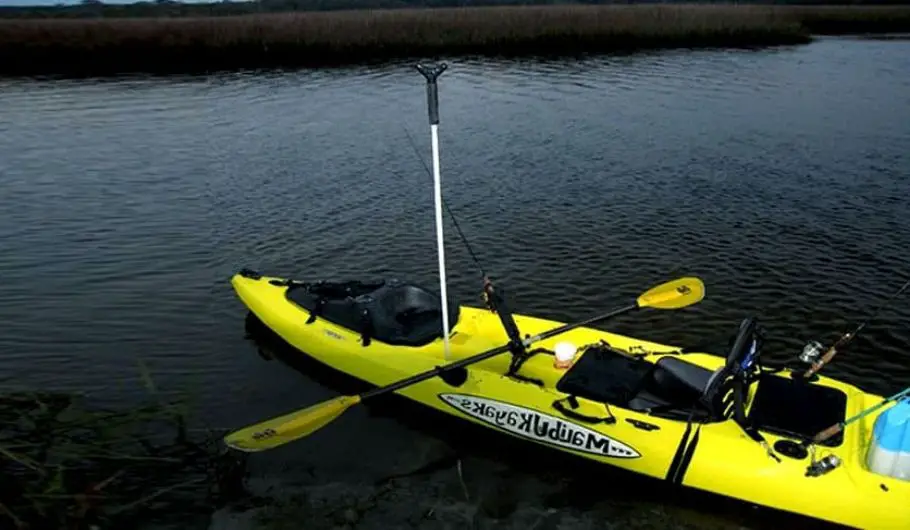
Anchor Pole/Stick
Some kayaks also have holes in them for anchoring. To use the hole, stick a long pole with a stake into it and then into the mud. You can also tie a post to the side of the kayak to stop it from drifting.
Read on to learn what dimensions your self-built kayak anchor should have and how to build it.
How Heavy Should A DIY Kayak Anchor Be?
A small folding anchor can weigh as little as 0.7 to 3 kg and still be enough to help keep your kayak from drifting in shallow, calm waters.
While light anchors work well in most situations, choosing a heavier anchor is better if you plan to kayak in rough or deep water.
If you want to know in advance what DIY kayak anchor system you need, follow these recommendations:
- Rope length = 35 m
- Rope thickness = 10-12 mm (this guarantees you a comfortable grip and strength)
- Length of anchor chain = 3 m
- Ring thickness = 8 mm
You can calculate the weight of the anchor using the simple formula W = X+Y+Z, where
- W is the anchor weight
- X is the weight of the boat in tons
- Y is the length of the boat in meters
- Z is the width of the boat in meters.
Example:
An inflatable kayak is 3.80 m long, 1.60 m wide, and weighs 0.09 tons (90 kg). Hence, you need an anchor weighing 5.49 kg.
Related Reading: Do you want to find out more about kayak dimensions? Read our full article here.
How Long Should A DIY Kayak Anchor Be?
It is essential to pay attention to the line length on your DIY kayak anchor system. Only if it’s long enough can the kayak anchor fulfill its purpose.
As a rule of thumb, a good starting line length is 75 feet (23 m). However, you may need to attach the anchor at different heights depending on the water depth.
Experienced kayakers will tell you to go by a ratio of 7:1. This means that for every foot of water you are in, you need 7 feet of line.
Your anchor line should be made of a light, strong, easy-to-handle material with good shock absorption, such as standard nylon, polypropylene or polyester. Make sure it sinks in the water.
Additionally, you should attach a piece of chain between the anchor and the rope that ideally matches your kayak’s length. This chain creates an optimal angle between the rope and the bottom of the water and prevents the rope from chafing against the bottom.
How To Pull The Anchor Out Of The Water Safely
Anchoring your kayak can be quite dangerous if not done correctly.
It all comes down to the point of contact with the kayak hull and the potential water movement.
If you are pulling out a heavy anchor or stuck to the bottom, a wave could pull the kayak against the anchor. This could force the kayak to capsize very quickly and abruptly.
That’s why you should never pull the rope to unhook the anchor from the side of the kayak!
To keep the kayak from tipping, the point of contact should be as close to the centerline and the stern or bow as possible!
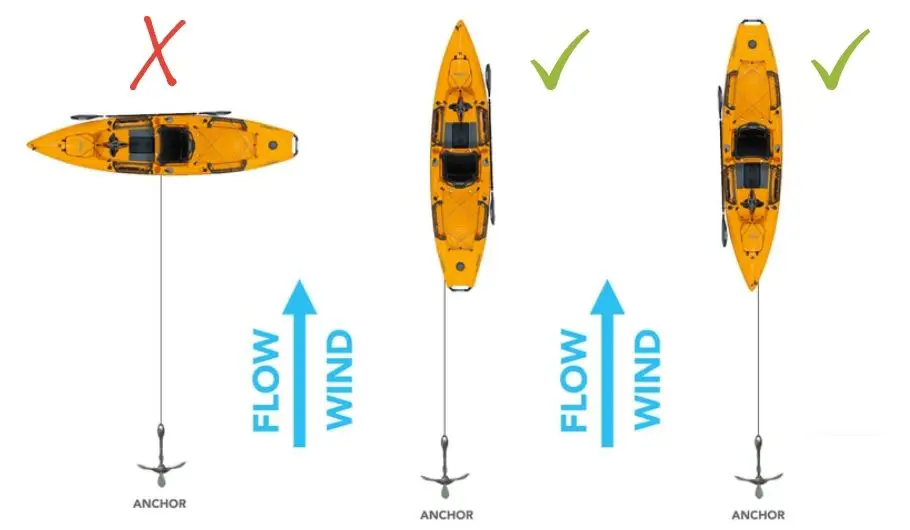
With the anchor rope attached in this way, the kayak does not tip sideways with the danger of capsizing. On the contrary, the bow or stern dips down slightly, and the kayak remains vertical and stable.
Bear this in mind when building and attaching your DIY kayak anchor system.
How To Build A DIY Anchor For Your Kayak
Option 1: Weight Anchor
- Get a small plastic bucket or cut up a large plastic bottle or a milk jug in half; keep the bottom.
- Get ready-made concrete mix and add water according to the instructions.
- Pour the wet cement into the plastic container, weigh it a few times, and add or subtract the mix to arrive at the desired weight.
- Hook: use an eye bolt or a hook bolt of around 3.5″ in length and screw two nuts in it with a washer in between (see image)
Try to get only galvanized nuts, bolts, and washers so they can better withstand saltwater. - The bolt should stand up by itself in the mix. If not, use a rope and tape to ensure it stays straight and above the concrete surface.
- Let settle for at least 24 hours before attaching it to a metal chain.
Alternatively: Wrap a retractable dog leash around a dumbbell and secure it with a carabiner.
This kayak anchor is only suitable for smaller watercraft under 20 feet in length.
You could add heavy objects to the concrete mix or design some spikes or prongs that stick out of the bucket for better grip.
A lightweight anchor like this can serve as a secondary kayak anchor for extra safety.
Option 2: Grapnel/Umbrella Anchor
- Arms: Get a 1-1.5″ wide reinforcing bar (a.k.a. rebar), which is a good and inexpensive material.
- Cut into 2 pieces of 10″ each and weld them together in the middle
Alternatively, cut into 4 pieces of 6″ each, bend them at one end, and weld them back to back. - Shank: Cut a piece of stainless steel pipe 3/4″ wide to length and weld it onto the center.
- Ring: Weld a metal ring on the other end of the shank and attach a metal chain to it. Attach the retractable line to the other end of the chain.
- Flukes: Bend the ends up a little to form the hooks.

The goal is to create a stable object with sharp, curved flukes that will grapple to the ground when thrown into the water.
It works on sandy and rocky lake and river bottoms, as it holds better the more obstacles it hits. The downside, however, is that it can get snagged and challenging to pull out.
Especially in a current, a grapnel anchor risks capsizing if you pull on it while the current pushes you away from it!
Option 3: Anchor Pole/Stick
This one is the easiest one to make:
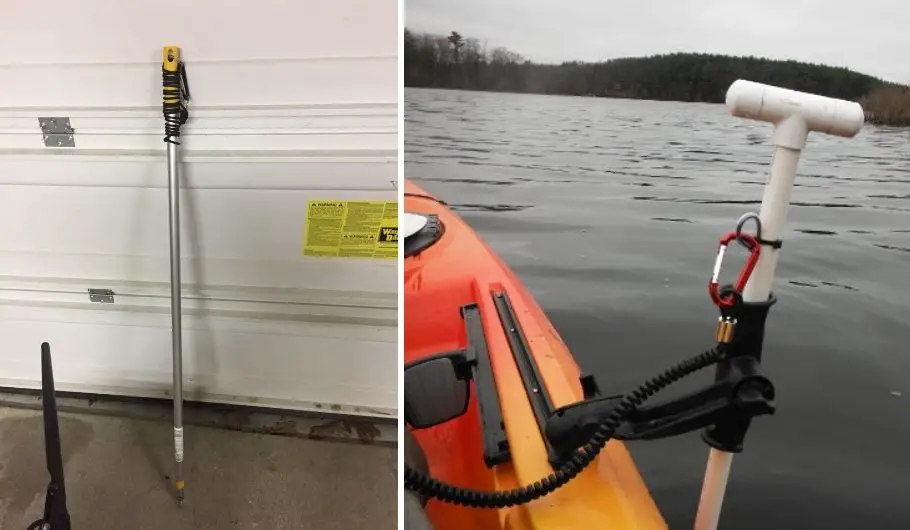
- Get an approx 3/4″ fiberglass stake from your home depot. Look for UV-rated so that the sun won’t break down the resin with time. Check the garden section.
An 8 ft pole anchor can hold a 20 ft kayak as long as the bottom is soft, and you can get the pole about 12 inches deep. Stronger wind or current or a heavier load could break the rod! - Handle: You can be creative here! Use a T-shaped PVC fitting with a suitable diameter and size. A bicycle grip will work too! Another great option is paddle grip tape to wrap around the pole.
- Adhere the handle to the top of the rod using epoxy resin
- Let dry and coat with paint if desired
If your kayak already has a pole anchor hole, you can get a long thick, and sturdy stick to use as an anchor. Just put it through the hole and into the seabed or lake floor as deep as possible.
Optionally, you can attach a sharp metal tooth to make it easier to stick in the sand.
This type of anchor is only suitable for shallow and relatively calm waters with a soft sandy or muddy bottom.
Do DIY Anchors Work?
Why wouldn’t they? DIY kayak anchor systems are a good solution for most kayakers when built and used correctly.
- Consider what purpose you want your kayak anchor to serve: If you’re kayaking on a calm lake and wanting to prevent your kayak from slowly drifting, any kayak anchor will do. If you’re fishing on a river with a medium current, then a good anchor that keeps you in place becomes necessary.
- Even lightweight anchors add weight to your kayak, so consider whether you need them.
- The greatest danger of an improperly attached or deployed kayak anchor is capsizing! It’s essential to practice casting and retrieve the anchor in shallow water near the shore and with obstacles (e.g., rocks, shells, driftwood).
- Be prepared for any situation that may arise when anchoring in a large body of water. As a last resort, be ready to cut the anchor line if something goes wrong!
Final Thoughts
Many beginners and even experienced kayak enthusiasts find it challenging to choose the correct kayak anchor setup.
Indeed, building your own DIY kayak anchor system lets you fit it precisely to your kayak and your needs.
As already indicated, it all depends on the properties and applicability. First of all, an anchor must be suitable for the purpose. Only then can you be sure that the anchor can withstand the demands.
A reliable anchor has it all by being durable, flexible to use, and compact.